

How to Install an AGA Cooker: What to Expect
Have you ever wondered how a half-tonne Aga cooker is installed? The majority of the cooker is made up of cast iron and the thought of installing them is often left to the imagination.
Each installation is different from the next and there are many contributing factors, meaning we can’t tell you exactly what to expect on the day. However, we hope this blog answers many of the frequently asked questions and gives you an idea.
When is Best to Install an Aga Cooker?
If you are having a new kitchen, it is recommended that you install your Aga cooker before your kitchen cabinetry is fitted and after your finished floor has been laid. At this point, it’s expected that any building works, plastering, tiling have been carried out. The cooker would then be installed directly on top of the completely level, finished floor.
The cooker can be installed into an existing kitchen, as long as the space in between the cabinetry is a suitable size for the Aga cooker that is being installed. Again, the floor would need to be level and it should extend under the where the cooker is due to be positioned, right up to the wall.
How to Install and Aga Cooker?
New Generation Electric Aga Cooker Models
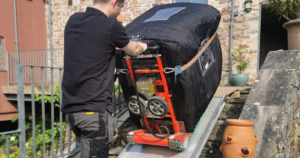
If the Aga cooker is one of the new generation models such as the Total Control, Dual Control, R Series or eR Series, then it is delivered as a whole, pre-assembled unit. The cooker is cleverly positioned into your kitchen by a team of two engineers. They use the help of heavy duty hydraulic moving equipment to move the cooker and get it into position in the kitchen. They use metal threshold ramps to move the cooker up small steps and even have the ability to move the cooker up & down a whole flight of stairs using electric stair climbing dollies. The cooker is then positioned carefully in place, ready to be connected to the electrical supply.
You will need to send videos and/or photographs of the access ahead of the delivery, so that the engineers can make sure they prepare for the delivery of the cooker accordingly. You will also need to make sure that the cooker fits in with the necessary dimensions, which will be provided way ahead of the delivery.
The electrical supply needs to be in place prior to the installation of the Aga cooker. Our engineers will then connect the cable accordingly from the cooker to your supply. The cooker will then be up & running by the time they leave, and ready to cook on by the evening.
Traditional Aga Cooker Models
Traditional models such as gas, oil or 13Amp electric are delivered in their component form, ready for the installation engineer to come along to install the cooker for you. The installation engineer can either come to install the cooker the same day or anytime thereafter. The installation of a traditional model takes the most part of a day. The engineer would connect the cooker to the fuel supply once they’ve finished the installation – it then takes around 8 hours to heat up from cold.
Flue Pipes & Venting
New Generation Electric Models
There is nothing quite as simple as the venting requirements for the new generation models. They are internally vented into the room, which negates the need for any plumbing through to the external wall and there are no fan boxes which need to be fitted to the outside of the house. The cooker has a small shroud which sits on the top plate – this allows for water vapour & cooking smells. Installing an Aga cooker has never been so easy!
Traditional Aga Cooker Models
The traditional oil & gas fired models require a flue pipe as the fumes are noxious and need to be vented outside. Typically, both of the models require a conventional flue, whereby the flue pipe is taken up to the highest roofline of the house. Any flue work required for the traditional models needs to be carried out and in place before the installation of your Aga cooker. The installation engineer would expect the flue work to be in place before their arrival.
Electrical Supply to Your Aga Cooker
If you’re having a new generation Aga cooker installed, then you will need to make sure that your electrical supply is in place, ready for the installation engineers to connect the cooker to. These cookers require a 32Amp fused spur supply, which needs to come directly from the mains. This needs to be located within a metre of the cooker, and can be sited on either the left or the right hand side. Ideally, the supply should be at the lower cabinetry level as this can then be discretely hidden away but also easily accessed if needs be.
In some cases, a handful of the new generation models may also require a 13Amp socket outlet if they have an induction hob – this needs to be a single socket and not a double socket. Again, the engineers will then connect the induction hob on the cooker to the power supply. Once the engineers have connected the cooker to the supply, they will turn on the cooker for you so it can begin to heat up for the first time in its new home!
Demonstration
Once the cooker has been installed and connected to the power supply by the engineers, they will then give you a demonstration on how the cooker works, and explain how long you will need to wait before you can begin to use it.
They will explain the ‘burn off’ period to you and that you need to leave the oven doors & lids open for a short period whilst it begins to heat up for the first time. They will demonstrate to you how to use the cooker by showing you the control panel and explaining which button or setting controls which part of the cooker. By the time you leave, you should be feeling confident about how to control the cooker.
Using the Aga Cooker
Hopefully, if time allows, you will be able to use the cooker by the evening depending on which model you have, as each model has different heat up times. The Dual Control, R Series & traditional models take around 8 hours to heat up from stone cold. The Total Control and eR Series take less time, so you’re more than likely to be able to use these by the evening. The hotplates on the new generation models take less than 10 minutes to heat up from cold, so you’ll be able to use those right away after the ‘burn-off period’.
What to Cook First on Your Aga Cooker?
Once the cooker has been installed and you’re up and running, the next step (and the most exciting) is to think about what to cook first! You may have something in mind which you’ve been planning to christen your Aga cooker with or perhaps you may be in need of some inspiration. As we all know, Dame Mary Berry has inspired many people with recipes to cook on their Aga cookers over the years. Have a look at some of Mary’s infamous recipes here.
Last but not least… Enjoy your newly installed Aga cooker, and Happy Cooking!
Looking for the perfect Aga cooker for your home? Browse our collection of reconditioned all electric models now.